Sunday, January 31, 2010

Moosli and Yoggert


EverydayG will vouch for me when I say that I can be a little bit particular about some foods. One of them is muesli. I find most muesli too sweet, and I particularly don't like dried fruit mixed in (although I do like it on it's own. Weird). So, I decided to make my own over the weekend.

I started by getting together some of my favourite nuts and seeds: walnuts, pecans, almonds, pumpkin seeds, and sunflower seeds. I guess I had about 3 cups in total. I toasted the nuts for about 10 minutes in a moderate oven, then I added about a kilo of rolled oats, the pumpkin and sunflower seeds, and sprinkled them with cinamon. I cooked these for another 5-10 minutes:


Once they were cooked, I transferred all of the ingredients to a big bowl, and added half a cup or so of flaxseeds:

Here is the final result. Yum!:

Monday, January 18, 2010

A Virtual Vegetable Patch

I've recently noticed a lot of links to software designed to assist home gardeners to plan and manage their vegetable patch and garden beds. Some software is for free, others require some level of payment... at the very minimum, you will have to fill out a form and receive junk emails for the next few years of your life. My advice - don't do it. There are many easy workarounds to achieve the same result.

Since I started my vegetable patch, I've been using Microsoft Powerpoint to plan and manage the garden. Most readers will have access to Powerpoint, whether it's on the home computer, at work, or in the local library.

Once you've opened Microsoft Powerpoint, click on View > Grid and Guides. This will give you a view that resembles graph paper. Work out your scale, and draw up your garden/bed/patch using options presented in the drawing toolbar.

Before I plant out my patch for the upcoming season, I box out my desired crop. For example, I know that I should allocate one square metre for a single pumpkin plant. Using my chosen scale, I create squares that resemble the appropriate spacing for the vegetables I would like to plant.

Once all of my desired plants are pictured on the slide in Microsoft Powerpoint, I move them around until I find the most effective use of space in the vegetable patch, keeping in mind the direction of the sun, height of the plant, and previous crop rotations.


Pictured above is a possible spring vegetable patch. Note the different shapes representing each vegetable. The size depends on the spacing that each type of vegetable requires. The process is a bit like putting a jigsaw puzzle together. It not only maximises your bed's capacity and harvest, but it provides a great record of your changing garden bed through the years. I keep the slides for each season to assist in managing my crop rotations.

Sunday, January 10, 2010

The Zucchini Cake Experiment

This weekend I decided to use up some of our excess zucchini to make a cake. I looked through a few recipe books for inspiration, but wasn't really taken by any, so I decided to make up my own.
I figured that if I took some guidelines from Stephanie Alexander, Bill Granger, and the trusty Woman's Weekly cookbook, I couldn't go too far wrong. That was the theory, anyway.


This was the final ingredient list I came up with:

125g softened butter
1/2 cup caster sugar
4 eggs
1 cup plain greek style yoghurt
2 cups plain wholemeal flour
2.5 teaspoons baking soda
1/2 teaspoon vanilla essence
pinch of salt
approx. 2 cups grated zuchinni (squeezed over the sink to get rid of most of the water)
1 cup walnuts/pecans
1/2 teaspoon cinnamon
1/4 cup ground flaxmeal (you could easily leave this out. I put it in because I had it in the cupboard)

Here are all the ingredients assembled nicely (except for the sugar, which I forgot about until I went to cream it with the butter. Oops!)

(On a side note: how cute are the russian doll measuring cups I got for Christmas? You can't see them very clearly, but trust me, they are cute!)

I started by creaming the butter and sugar together, until it was light and fluffy. Then I added each egg, one by one, beating in between each addition:


Gradually folded in the yoghurt, flour and baking soda:


And folded in the grated zuchinni and nuts, cinnamon, and salt:

Until it looked like this:


I split the mix between a small loaf tin and a muffin rack. The muffins took about 20 mins in a moderate (180 degree) oven, while the loaf took about 40 minutes.

Before:


After:


So, the verdict? G and I both gave this the thumbs up. It turned out more like a nut loaf, or banana bread than a cake, which we both prefer anyway. More sugar might make it more cake-like, if that's more your thing. But overall, I think the zucchini cake experiment was a success!

Saturday, January 9, 2010

Tomato Taste Test

As previously posted, we're growing three different types of tomatoes this year: Tommy Toes; Wapsipinicon Peach; and Black Russians. We planted all three varieties as seedlings on 4 October last year (according to my diary). I couldn't have been happier with how they've grown. We've been eating tomatoes since Christmas Day... and there's no stopping them at the moment.


The Wapsipinicon Peach is my favourite, no matter how hard it is to spell and pronounce. The name describes the texture of the tomato which is slightly fuzzy to touch. The taste is nice and sweet and just offers something a little different to the tomatoes I'm used to. Our yields haven't set the world alight, and the size of the tomatoes are quite small. However, they rarely survive to the kitchen, which is always a good sign.


The Black Russian seems to be every gourmet tomato lover's favourite. As the tomato ripens, the colour transitions from a green to a dark shade of red, almost resembling a plum. Our specimens have been full of juice and flavour. Personally, I haven't been all that excited by the taste, but everybody else who samples from our garden seems to be. Our yields have been somewhere between the Wapsipinicon Peach and the Tommy Toe.


We just can't stop the Tommy Toe plants from growing. This was the first of the three varieties to ripen, and continues to give us three of four tomatoes a day. If you're new to tomato growing, I'd recommend these to start with. I'd just give them plenty of room and support and let them go crazy. I can see why they work in hanging baskets. In terms of taste, they're exactly what you'd expect. Nice and sweet. A great salad tomato.


Like my presentation? I watch Masterchef.

And the verdict...

1. Wapsipinicon Peach - 4 stars. The taste is superb. The yield is average.

2. Black Russian - 3 stars. Plenty of juice and flavour. Great colour. I'm not overly sure how to use them.

3. Tommy Toe - 3.5 stars. Lives up to its reputation.

Tuesday, January 5, 2010

Green Tomato Chutney

Last weekend I gave the tomatoes quite a savage crew cut. Probably somewhere between a number 1 and bald. They were going downhill fast because I haven't cared for them like I should have. All six plants were a tangled mess and literally suffocating from it.


After emergency surgery, they look a little more like grape vines than tomatoes.

Once I'd spent an hour untangling the plants and giving each of them a good trim, I looked down at the ground to see a small bucket full of green tomatoes. Waste not want not... so I went searching for a good green tomato recipe.

I took elements from a few different green tomato chutney recipes and came up with the following:

Recipe

8 cups of chopped green tomatoes
2 large chopped onions
1 chopped red capsicum
sea salt
1 1/2 cups of white vinegar
1 1/4 cups of brown sugar
1 tablespoon of curry powder
1 tablespoon of celery salt
1/2 teaspoon of tumeric
1/2 teaspoon of cinnamon

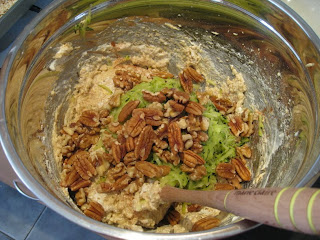
The first step is to combine all of the chopped vegetables. Level them out in a wide/deep saucepan and sprinkle a small handful of sea salt over the top. Once this is done, leave it to sit overnight. This brings out the moisture in the vegetables.


Great colours, nothing like fresh ingredients.

Next step, after a good night's sleep, is to rinse the vegetables and drain them. Once this is done, combine all other ingredients in a new saucepan and bring it to the boil. Add the vegetables and reduce it to a simmer. Simmer for 15 to 20 minutes, stirring occasionally.

You will know when it's ready, as the green tomatoes will start to lose their shape a little. You should be left with a nice rich even colour at then end - somewhere between mustard and baby vomit.

Sterilise your jars before filling with the chutney. I put glad wrap over the top before screwing the lid on just to be sure that it keeps nicely. The recipe will fill two large jars or three medium sized jars.


So much flavour and so easy! Great on fresh bread or with a cracker. Don't waste your green tomatoes.