Tuesday, December 29, 2009

Secrets and Lies

It's late December and it's all happening in and out of the garden. All of our plants are producing, with new secrets to discover every time we arrive home from work. On the flipside, the ambitious growth of our patch seems to be causing me a few problems.


Black Russian Tomato


Lebanese Cucumber


Italian Capsicum - The case of the brown bum capsicum seems to be happening alot. The bottom seems to rot, rather than burn. I thought this only happened with tomatoes? (Blossom end rot)

Lazy Housewife Bean

Black Beauty Zucchini - These just grow and grow and grow. We've had about 7 now. When will they stop? My guess is 15.

Delicata Mini Sweet Pumpkin

Okay, so now the success stories out the way... to my tomatoes. This year (my only year to date) I have been raising Tommy Toes, Black Russians, and Wapsipinicon Peaches (WPs). The WPs are winning the taste test. The Tommy Toes are everywhere. The Black Russians need to hurry the hell up already.

I've done very little in terms of maintenance. Some websites advise to pinch out side shoots and growth at the top of the plant once the optimum size is reached. As this was my first year in the garden, I decided to just let them grow and see what happens. The first approach should always be the lazy approach in my book. Needless to say, they've reached a size where the stake no longer supports the growth. As such, most of the plants' new growth is at ground level, and spilling over the side of the patch.


This picture shows the new growth on the Black Russian tomato plant - plenty of flowers and nice and green (photo was taken in 37 degrees).

Despite the growth, my plants are dying a slow death. Every one of my six tomato plants seems to be dying from the bottom up. It's quite sad to watch. My rational explanation is that the plant is simply shedding unneeded leaves to channel energy to the existing fruit. The thick canopy may also be shielding light and subsequently having a negative impact at the base of the plant. But I'm losing a hell of a lot of leaves.


This is the base of the WPs. Not the worst example, but you get the picture. I've been deadheading the plants, but it's tough to keep up.


I don't have a solution to the problem. I'm just going to watch it closely for the time being. Next year though, I'll try to manage the size of my tomato plants more effectively to ensure that the plants have plenty of ventilation and support.

Tuesday, December 15, 2009

Slim Shady

Hi. L here!

So far I haven't been too involved in the veggie patch. With the exception of talking to the tomato plants occasionally, G has done all of the work. So on the weekend I decided it was about time I contribute. I dusted off my trusty sewing machine, and set forth to make a shade cloth.

I should start by saying that I am very new to sewing. My experience to date is limited to numerous fluorescent hair scrunchies in the eighties, and more recently, cushions for our couch. Yeah, that's it. So, bear that in mind when you look at the results - I am just learning!

Firstly, meet Bernie (short for Bernina Bernette):


(I wasn't sure how she would cope with sewing the shade cloth. It's a bit more heavy duty than the scrunchies. But overall, I was very happy with how she went.)

OK, so for our vegie patch, we needed 2 shade cloths, each about 3 X 1.7m. I cut the shade cloth material out, allowing a little extra around the edges to allow for a hem. I then enlisted the help
of some bulldog clips to fold over the hem and hold it tight:


I'm really not sure how much the shade cloth will stretch out of shape once it's set up, but I wanted to minimise this as much as possible. I sewed the hem around all 4 edges using a triple stitch for extra strength. I did this along the join between the 2 edges of material (the main
shade cloth and the rolled over hem), as well as the very edge. This might have been overkill, and it might not even have made any difference, but as I am not very good at sewing straight, I figured it was good practice anyway!

I also decided to sew in a couple of extra strips of shade cloth across the width of the material to give it extra support. I folded over 3 1.7m X 10cm pieces of material lengthways, and stitched eached one closed. I attached one each metre or so along the length of the shade cloth using masking tape, then sewed them to the cloth, again using the triple stitch.


Once that was done (several rolls of cotton later - that triple stitch eats up the cotton fast!), I was ready to attach the tags that would hold the cloth onto a wooden pole. I enlisted the help of G to cut out 20 or so 25 X 10cm pieces of shade cloth. This gave the tags enough length to be wrapped around the wood we had chosen, as well as plenty to attach the ends firmly to the shade cloth.


I doubled each piece lengthways, then sewed around the edges.

I measured each one as I attached it, to make sure all of the tags would line up evenly when we attached them to the wooden pole (and also foudn the macro function on the camera :) )

Then, it was time to install it in the garden!

The tags were threaded along 2 wooden poles:


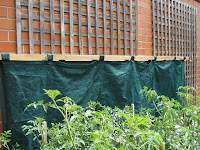
And then lifted onto 2 hooks attached to next door's garage (Note the healthy looking tomato plants - obviously talking to them has been effective!). The shade can be taken off for cool days:


Or stretched over to attach to the hooks screwed in to 2 star pickets hammered into the ground in front of the veggie patch:


Just in time for today's 39 degree weather!

Sunday, December 13, 2009

First Across the Line

The question - Which plant would be picked first? It was two horse race - Zucchini and Capsicum. We picked the capsicum. We tasted the capsicum. Too small. Too bitter. Capsicum was out. Zucchini was the winner.

It's amazing how quick they grow. I would estimate that the last third of the zucchini appeared in 24 hours. If anything, we picked this zucchini too late. But we still felt burnt from the capsicum experience.

We're growing the Black Beauty variety from seed purchased at Diggers on the Mornington Peninsula.

Once harvested, we turned the zucchini into some fritters with some haloumi cheese and fresh mint. If anyone is interested, you can find the recipe at . The result was a little bland. I'd probably up the mint next time. All in all though, it was great way to bring in our harvest season.

From the looks of things, my zucchini plant has a touch of powdery mildew. Apparently this can be solved with some diluted full-cream milk. I don't think it's at that stage yet though, so I'll keep the milk for my muesli.

In the photo above, you can see the start of another two zucchini coming along. I might try stuffing and cooking the flower when it blooms.

A large zucchini or a very small phone?


Fritters.


Saturday, December 12, 2009

A Bean Short

I've never grown climbing beans before, in fact I've never really grown anything before. I once grew a strawberry plant on my balcony at a previous rental property. The end outcome was two strawberries, and a satisfied magpie.

So I didn't really know what to expect. I remember the story of Jack and the Beanstalk, but I thought it a touch over the top.

The word 'climbing' on the packet gave the game away though, so I made sure I hammered in a stake before i planted the seeds. That was my first mistake. Beans aren't adept at climbing on a square peg - they prefer a round one. My second was to half the size of my pegs to less than a metre. Not a great foundation for Grade A quality beans. No Jack and the Beanstalk for me. Not unless the giant was going to meet me half way.

Six weeks later and the beans are desperately searching for something. The best I've been able to do is to create a clothes line effect with string between the square stakes. It's too far in now to remove the stakes, as I don't want to disturb the roots. Oh well, I guess I'll see how it goes.


The First Season of Many

We moved into our first house in the western suburbs of Victoria earlier this year. After living in a one bedroom apartment for five years, spending time in our new backyard was an attractive option. So once I grew sick of the inside renovations, I turned my attention to building a raised vegetable garden.

Our raised vegetable garden is 6 metres long by 1.5 metres wide. The bed is north facing and backs on to a neighbouring brick garage, which should keep the patch warm through the colder, frostier months. It took a full day to construct the bed. We used red gum timber - it looked good and we knew that it hadn't been treated. All up, the bed cost approximately $300 to build. I filled it with three cubic metres of compost mix, which contained plenty of horse manure and mushroom compost.

Our first season's crop consists of:

Pumpkin, Zucchini, Cucumber, Climbing Beans, Capsicum, Tomatoes, Lettuce, Potatoes, Lemon Thyme, Rosemary, Basil, Chilli, Parsley and Coriander.

Friday, November 27, 2009

Learning to Learn Again

Convenience plays a huge role in the choices we make. We in effect buy time. But what are we missing out on in the process? This blog casts convenience aside to discover the joy of creating everyday things from scratch.